Original Link: https://www.anandtech.com/show/6296/gigabyte-z77xup4-th-review-thunderbolt-times-two
Gigabyte Z77X-UP4 TH Review: Thunderbolt Times Two
by Ian Cutress on September 17, 2012 11:00 AM EST- Posted in
- Gigabyte
- Motherboards
- Z77
- thunder
Now that the exclusive license Apple had for Thunderbolt has expired, since Computex 2012 we have seen a number of motherboards destined for PCs with a Thunderbolt connector. Thunderbolt on a motherboard is still an added luxury, adding some $40 to the cost of the board to the user, though that can pale in comparison to the cost of Thunderbolt devices and storage. Despite all this, Gigabyte’s foray into the Thunderbolt world is initiated in part by the board we are reviewing today – the Gigabyte Z77X-UP4 TH. Using the Z77 chipset we get a motherboard with two Thunderbolt ports, but it also has the enhanced power delivery brought about by Ultra Durable 5.
Gigabyte Z77X-UP4 TH Overview
Like many Gigabyte boards in the Z77 range, there are very few issues with the Ivy Bridge platform in Gigabyte’s hands. Due to MultiCore Enhancement, CPU performance matches that of other Gigabyte and ASUS products this generation, and the Z77X-UP4 TH comes with the two major additions – a two port Thunderbolt controller, and IR3550 ICs to help with the power delivery. As we saw on the Gigabyte X79S-UP5, these ICs do help with power consumption assuming the cost can be justified.
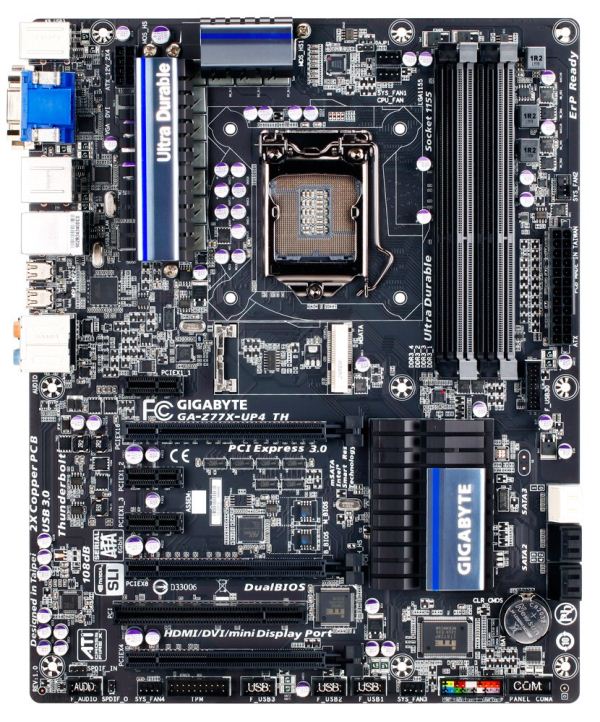
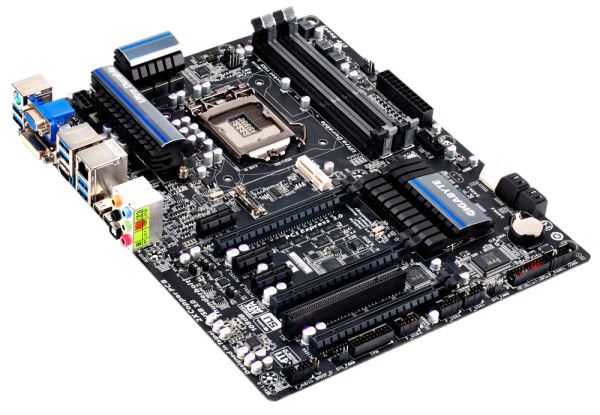
Visually, the board does look a little empty with smaller heatsinks, a gap left for an mSATA drive and some empty IO, but we do have a classic three-way PCIe device implementation such that with an Ivy Bridge processor, the board can run x16/-/-, x8/x8/- or x8/x4/x4 in PCIe 3.0 mode. We lack any extra SATA ports, with only those provided by the chipset being used, and the back panel uses only USB 3.0 – two from the chipset and four from a VIA VL800 controller. The other two USB 3.0 ports that the chipset provide are used for an onboard USB 3.0 header.
In terms of extra hardware and controllers beyond the chipset standard, we are hard pushed to find anything special beyond the Thunderbolt controller – sure there is a USB 3.0 VIA VL800 chip, but the audio is a Realtek ALC892 and the Ethernet is a Realtek 8111. The iTE chips onboard give us access to a combination PS/2 port and a COM port as well. But the lack of extra SATA ports is perhaps a little strange for a UP4 product.
Performance on the Z77X-UP4 TH comes on par with the other Gigabyte motherboards tested. This is due to the fact that the Z77X-UP4 TH enables MultiCore Enhancement when XMP is enabled, as per our standard testing methodology. This gives our test bed an extra 200 MHz under full threaded load, which benefits all CPU intensive tasks. Power consumption, due to the use of IR3550 ICs, is low compared to most Z77 motherboards we have tested, and the third PCIe 3.0 slot at performs well with a PCIe 3.0 GPU plugged in.
The only question mark comes down to the price. Thunderbolt and Ultra Durable 5 are, to quote a famous brand, ‘reassuringly expensive’. Thunderbolt adoption in the PC market is quite low right now due to the lack of competitive pricing, so having two ports on board for up to twelve devices is a bit overkill. This limits the Z77X-UP4 TH more into a niche target segment. Though if you have 6-12 TB devices, then this is a nice board to consider. For all other usage scenarios, your $190-$200 might be worth investing in a Z77X-UD5H.
Visual Inspection
One of the benefits of using the IR3550 ICs in the power delivery is that because each one is rated up to 60 amps, this means fewer phases are needed on board. Having fewer phases means saving energy and cost, but also results in smaller heatsinks, especially when we consider the IR3550s have unique IP to help keep cool. This reduction in the number of phases along with the smaller heatsinks gives the socket area of the Z77X-UP4 TH a lot of room. Almost every air cooler under the sun should fit on this motherboard, even a NoFan. (Actually, the NoFan will probably impinge on the memory slots, requiring low profile memory).
The heatsinks are set away and to the left and the top of the socket area – the right hand side has memory up against the Intel specification distance, but to the south we have a larger empty space than normal due to the mSATA location and the movement downwards of the first full length PCIe slot. For fan headers the CPU area has access to three in the immediate vicinity – two to the top right of the socket (both 4-pin, one CPU and one SYS), and another just above the 24-pin ATX connector (4-pin, SYS). The other two fan headers on board are found on the bottom, again 4-pin and also SYS headers.
The right hand side of the board is empty compared to a lot of other Z77 boards we have seen – from top to bottom there is a 4-pin SYS fan header, the 24-pin ATX power connector, a USB 3.0 header (powered by the chipset), two SATA 6 Gbps ports in white and four SATA 3 Gbps ports in black. One of these black SATA 3 Gbps ports shares routing with the mSATA, meaning only one of them can be used at a time. The chipset heatsink has nothing extra in the way of controllers to cool, so it is relatively small taking care of the chipset chip itself.
The south side of the board gives us front panel audio (found at the back of the board case wise – this confuses me a little), a SPDIF output header, a 4-pin SYS fan header, a TPM header, three USB 2.0 headers, another 4-pin SYS fan header, front panel connections and a COM port header. Ideally I would think that the COM port header and the front panel audio header should be swapped. It is also interesting to note that this PCB has the old ‘ATI CrossFireX’ logo stamped on it, rather than the new AMD one we see on other products.
The PCIe layout is set up to give maximum cooling for a dual GPU setup, despite being configured for a tri-GPU configuration. From the top we have an x1, x16 (x8 in dual and tri), x1, x1, x8 (x4 in tri), PCI and x4. Placing a GPU in the bottom slot could potentially restrict the bottom headers and any cables inserted.
It is worth noting on the board that a few minor details are not present – neither power/reset buttons nor a debug LED are provided. Both of these features are prevalent to testers, overclockers and system builders dealing with overclocked configurations. There is a small BOM cost for applying such additions, but it could save hours of headaches if a stick of memory fails.
The IO back panel features a combination PS/2 port, video connections (VGA, DVI-D and HDMI), six USB 3.0 ports in blue (two from the chipset, four through a VIA VL800 controller), a gigabit Ethernet port (Realtek), two Thunderbolt ports, an optical S/PDIF output and audio jacks. The two Thunderbolt ports are powered by a single DSL3510L chip, which means peak bandwidth between the ports will combine to a maximum of 10 Gbps, rather than 10 Gbps each. This is also dependent on the PCIe devices connected in the board. However, both ports will support a TB display each, making a maximum of four video outputs possible (VGA, DVI or TB2, HDMI, TB1).
Board Features
| Gigabyte Z77X-UP4 TH | |
| Price | Link |
| Size | ATX |
| CPU Interface | LGA-1155 |
| Chipset | Intel Z77 |
| Memory Slots |
Four DDR3 DIMM slots supporting up to 32 GB Up to Dual Channel, 1066-1600 MHz |
| Video Outputs |
VGA DVI or TB2 HDMI TB1 |
| Onboard LAN | Realtek 8111 |
| Onboard Audio | Realtek ALC892 |
| Expansion Slots |
1 x PCIe 3.0 x16 (x8 in dual) 1 x PCIe 3.0 x8 (x4 in tri) 1 x PCIe 3.0 x4 (when IVB CPU is used) 3 x PCIe 2.0 x1 1 x PCI |
| Onboard SATA/RAID |
2 x SATA 6 Gbps (Chipset), RAID 0, 1, 5, 10 4 x SATA 3 Gbps (Chipset), RAID 0, 1, 5, 10 1 x mSATA 3 Gbps (disables SATA2_5) |
| USB |
4 x USB 3.0 (Intel) [2 back panel, 2 onboard] 4 x USB 3.0 (VIA) [4 back panel] 6 x USB 2.0 (Intel) [6 onboard] |
| Onboard |
2 x SATA 6 Gbps 4 x SATA 3 Gbps 1 x mSATA 5 x Fan Headers 1 x USB 3.0 Header 3 x USB 2.0 Headers 1 x COM Header 1 x TPM Header |
| Power Connectors |
1 x 24-pin ATX Power Connector 1 x 8-pin CPU Power Connector |
| Fan Headers |
1 x CPU (4-pin) 4 x SYS (4-pin) |
| IO Panel |
1 x PS/2 Combination Port 1 x VGA 1 x DVI-D 1 x HDMI 6 x USB 3.0 1 x Realtek GbE 2 x Thunderbolt 1 x Optical S/PDIF Audio Jacks |
| Warranty Period | 3 Years |
| Product Page | Link |
Despite Thunderbolt and IR3550 ICs onboard, we are lacking much grunt in the design. No extra SATA, no Power/Reset buttons or debug LED, Realtek Audio+NIC. It is easy to visualize the design team being told to create a board ‘with Thunderbolt and Ultra Durable 5’, but being given a tight budget to work within. However the usage scenario for the user has to be on the Thunderbolt design to make the purchase worthwhile – in essence the Ultra Durable 5 power delivery is an added extra. I bet a Z77X-UD4 TH would sell just as well if not better than the Z77X-UP4 TH.
Gigabyte Z77X-UP4 TH BIOS
We have tackled Gigabyte’s 3D BIOS several times over the past few months. It used to be slow and dim-witted, with slow transitions and a distinct lack of organization. Since then, the Z77 BIOSes has been improved in terms of speed and feel, to something more-or-less useable. There are still some niggles to contend with – no serious explanation of features, the 3D BIOS mode could be improved a whole lot, and overclocking options are still hap-hazard. If our words are being considered by Gigabyte, then perhaps there an update soon would alleviate some of these issues.
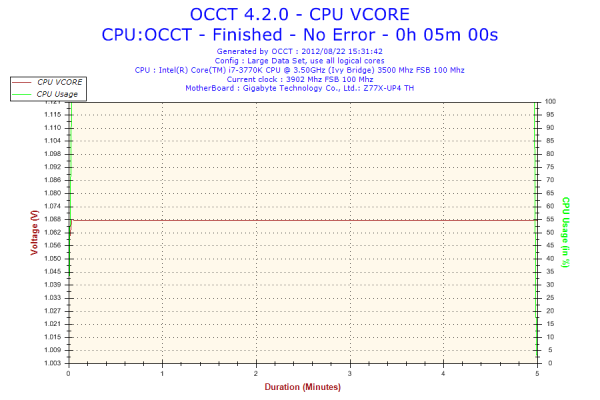
Gigabyte still has a couple of issues that need greater attention though. It seems hit and miss if a BIOS affects our DPC Latency test, which is a good indication of audio responsiveness – sometimes a Gigabyte BIOS, in combination with EasyTune6’s hardware monitor, will cause DPC latency to rise to 1000+ microseconds. Typically a value below 200 is preferred, and it is fixed on some BIOSes and models, but it was not fixed for our testing. One other point of contention is the manipulation of the reported voltages of the CPU from BIOS to OS. Whenever a voltage was set manually in the BIOS, e.g. 1.200 volts, the software in the OS would read the save value no matter the setting at load – 1.068 volts. This indicates that at some level the value is either not being passed to the OS or is being manipulated by the firmware. This needs to be updated ASAP.
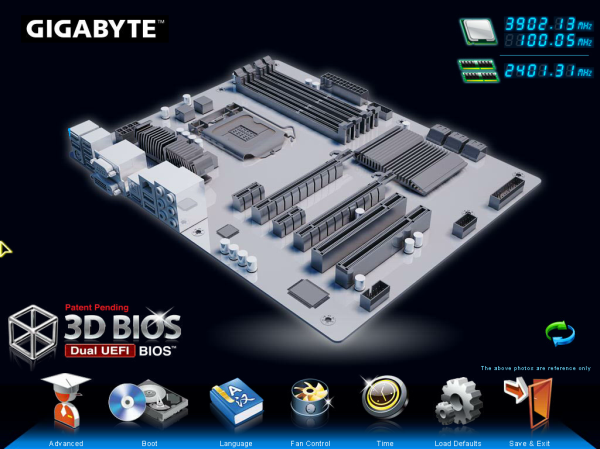
The BIOS system itself starts with the 3D BIOS mode, as shown below:
On the screen is an oblique angle image of a motherboard. The actual layout of the motherboard in the image does not always reflect the motherboard in question – Gigabyte use a generic image per chipset and per motherboard size. The important areas are those that are clickable, such as the CPU socket, the memory, the PCIe slots, the chipset, the SATA ports and the IO panel. Each one offers a small selection of the full blown settings. While this is useful from a ‘quick’ perspective, as I have mentioned on previous Gigabyte reviews, if I asked a family member who is not au fait with motherboard terminology to ‘go change the SATA settings in the BIOS’, they would not have a clue just looking at the image. This leads to my previous suggestion of hover tool-tips when the mouse is over certain elements.
What irks me more is the lack of detailed information when we go into the BIOS. Nothing indicates us to which motherboard is installed, which CPU is present, how much memory there is, temperatures, voltages or fan speeds. Each of these is vital for a system builder or to diagnose faults. Instead we have to navigate to the advanced menu for this; however it should be available of the bat.
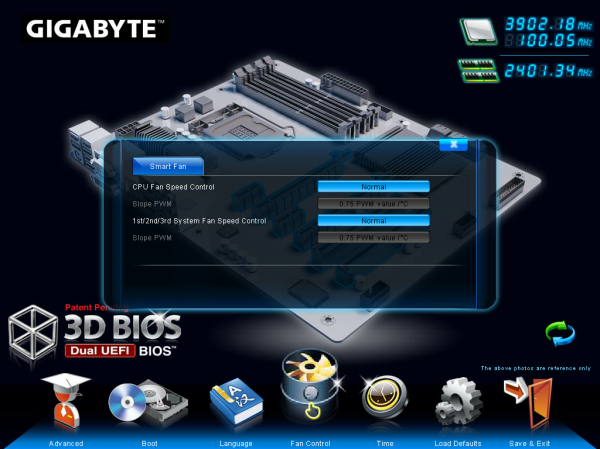
Also in this ‘3D BIOS’ mode, we get options to change the language of the BIOS, the boot order of the devices currently connected and the fan controls. The fan controls have been a regular contentious issue, as Gigabyte only offer settings in terms of PWM values / °C rather than fan % or RPM values. It should not be too hard to knock up some form of advanced fan control if you have access to temperatures, fan speeds, and can control the PWM values, however no thought was applied despite there being a wealth of potential.
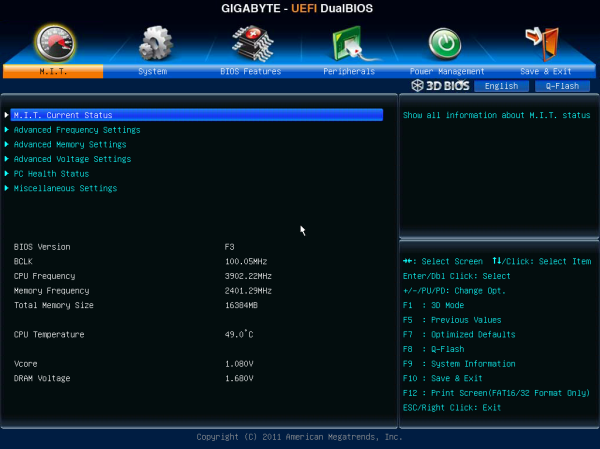
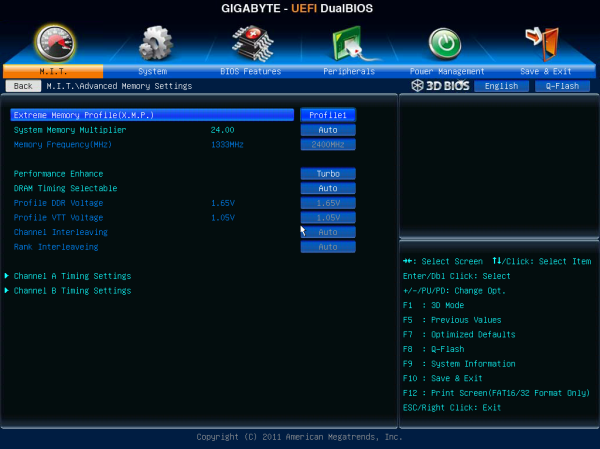
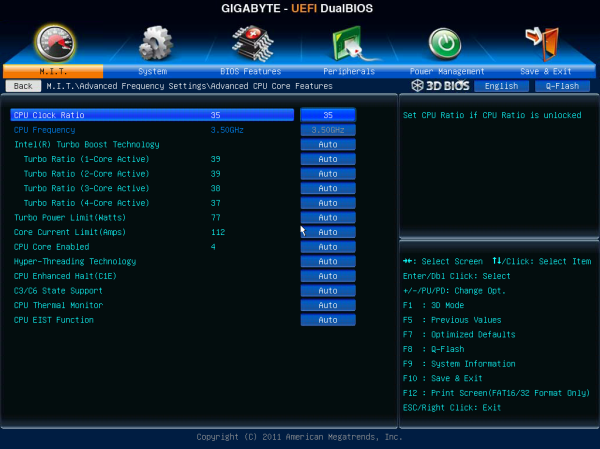
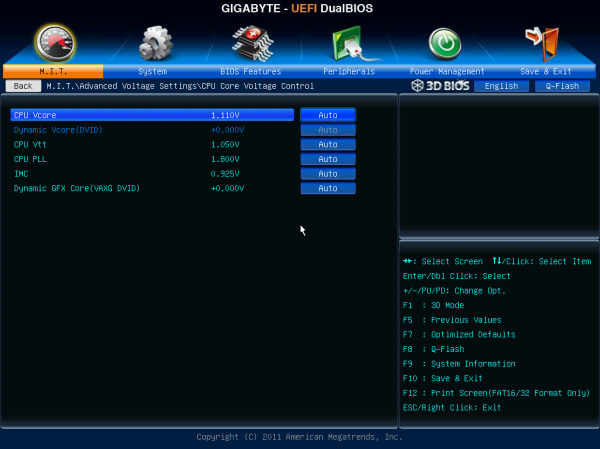
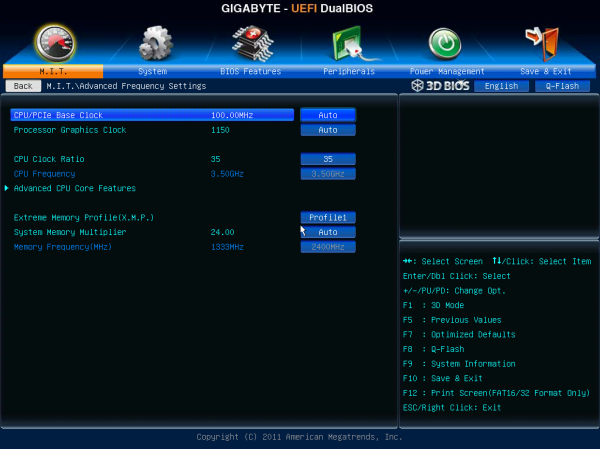
The Advanced menu takes us into the hub of overclocking settings, designated M.I.T. This section gives us menu options for CPU speed control, power calibration settings, memory settings and voltage settings. Although from a navigation perspective, it is a clumsily laid out, with CPU speed, CPU voltage and CPU Load Line Calibration all being in different menu settings. It would have been easier to group the important options into a separate new menu and still keep the old layout. Despite this, we got very good manual overclocking results, hitting 4.8 GHz at 1.300 volts.
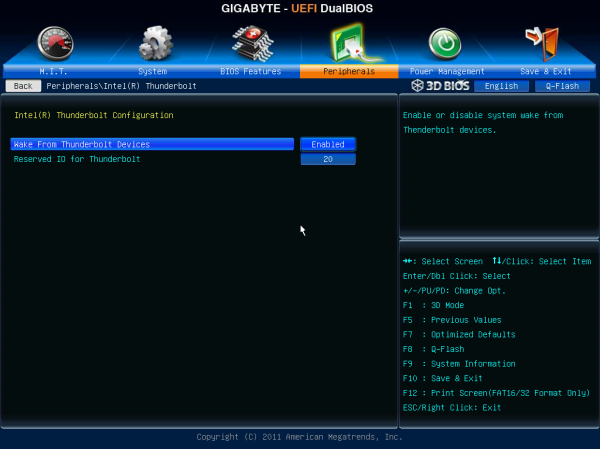
Options to enable and disable controllers are found in the Peripherals menu, including all options related to Thunderbolt.
Gigabyte Z77X-UP4 TH Software
The software stack that comes with Gigabyte products has been fairly stagnant the past 18 months. As detailed in our recent reviews of other Gigabyte motherboards, the stalwart of the pack is EasyTune6, featuring automatic overclock modes, fan controls and a hardware monitor for temperatures. On top of this we have the @BIOS software for updating the firmware of the motherboard from inside the OS, and more recently there have been two newer additions to the software – Gigabyte Tweak Launcher (a stripped down OC interface) and USB Blocker.
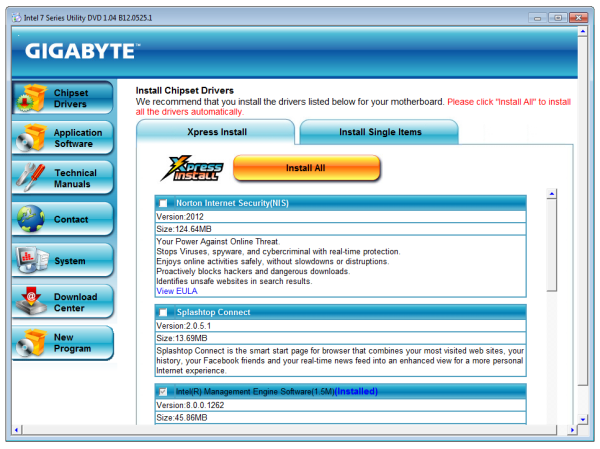
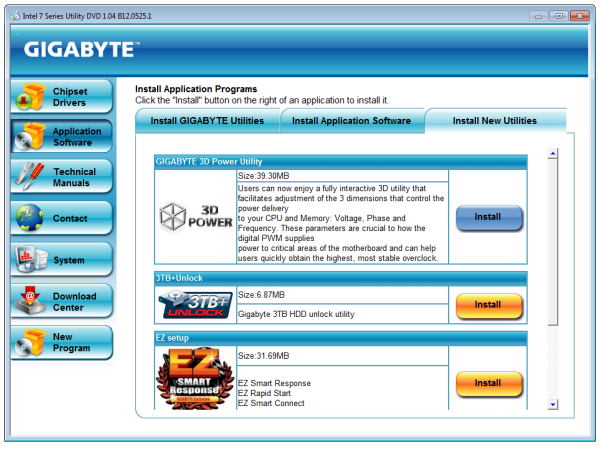
The install CD does not win any awards for looks, but in terms of function we have a one button install all on drivers and some software. More advanced tools (Gigabyte Tweak Launcher, USB Blocker) have to be downloaded direct from the Gigabyte website, or a few such as 3D Power and 3TB Unlock are installed individually by the user from the disk.
EasyTune6
The EasyTune6 software was on the very first Gigabyte motherboard I reviewed for P67 way back in January 2011, and it probably predates even then. The main premise of ET6 is a simple interface in order to invoke a series of preset overclocks:
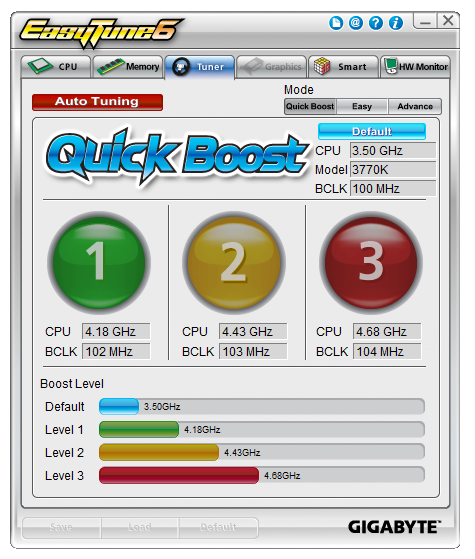
As shown, we get a choice of three boost levels – these are all tested in our overclocking section, along with ‘Auto Tuning’, which is Gigabyte’s automatic overclock tuning software. Alongside these presets, ET6 allows users to control BCLK, multipliers and voltages from the more advanced menus.
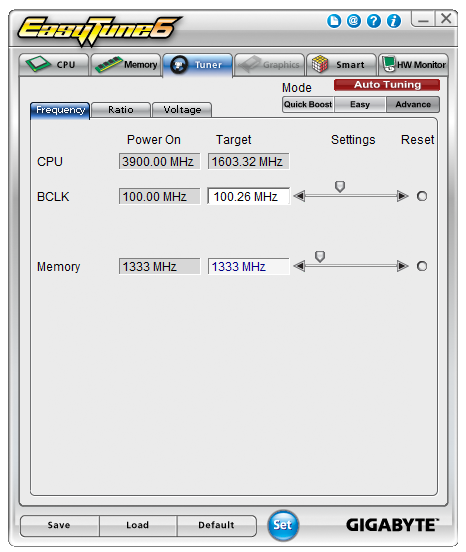
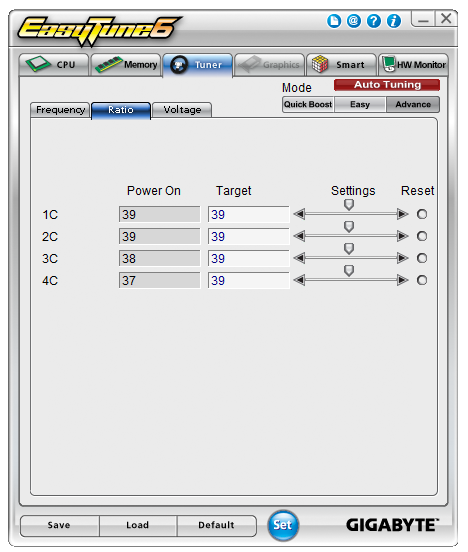
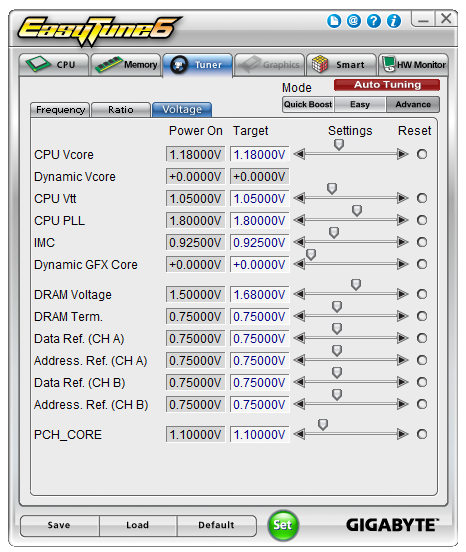
The other areas of ET6 give the user information on the CPU, memory and GPU, similar to the diagnostic tool CPU-Z. With an appropriate GPU, ET6 will also act as an overclocking tool for the GPU as well.
EasyTune6 features fan controls as well, where we can determine the start and end point for a single gradient:
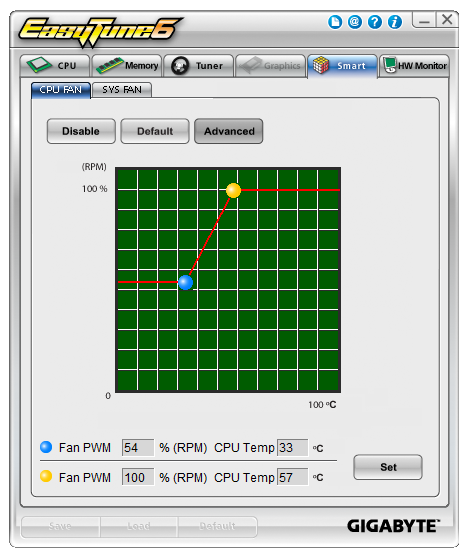
As shown, we only have control of the fans in two sets – one setting for the CPU fan, and another setting for all other fans on board. Compared to other fan controls on other motherboards, this is pretty poor – ideally we would have individual control of each header, multi-point gradient application and hysteresis.
The final part of ET6 is the H/W Monitor, which plots a graph of particular values (temperatures, voltages) against time. H/W Monitor is also the culprit of large Deferred Procedure Call latency during testing, so if audio is important to you make sure ET6 is turned off.
@BIOS
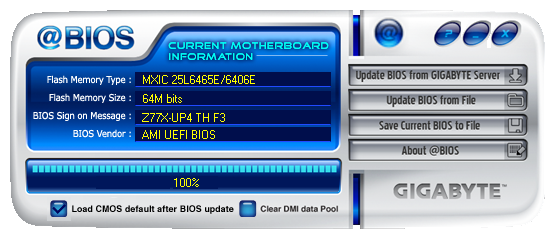
Every motherboard needs to have two utilities to update the BIOS – one inside the BIOS itself and another in the OS. @BIOS is the tool Gigabyte uses for the OS, and it enables users to directly check Gigabyte servers for the latest BIOS, as well as update from a file.
Ideally, this feature should be integrated into ET6, so we do not have to deal with extra icons or programs in the OS.
USB Blocker
From the requests of users, Gigabyte has created a new tool that helps to control what devices can and cannot be plugged into the USB ports. This is extremely relevant to protect machines in a SOHO environment from external devices which may infect a network. The premise of USB Blocker is simple - behind an admin password, the USB ports can be disabled when certain types of devices are plugged in.
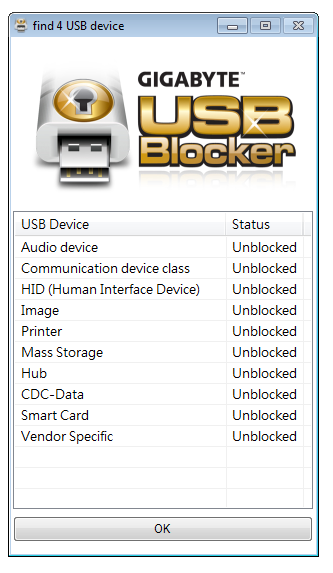
Almost ironically, USB mice and keyboards can also be blocked. Gigabyte has told me that the only way around this is to boot in safe mode and uninstall the software, or plug in a PS/2 mouse if applicable. This would suggest that the USB ports are only blocked when the software is running and thus if you can disable the software in msconfig from starting up, it should disable the functionality.
Gigabyte Z77X-UP4 TH In The Box
The Gigabyte naming range covers anything from a UD2 up to a UP7 and all in-between. The big numbers usually indicate a higher level of product, and if any of the recent reviews have shown is that moving from a UD4 to a UD5 (or a UP4 to a UP5) is actually a big jump in terms of functionality, design, and included extras. With the Z77X-UP4 TH, we get the following:
Driver CD
User Manual
Rear IO Shield
Four SATA Cables
Flexi SLI Bridge
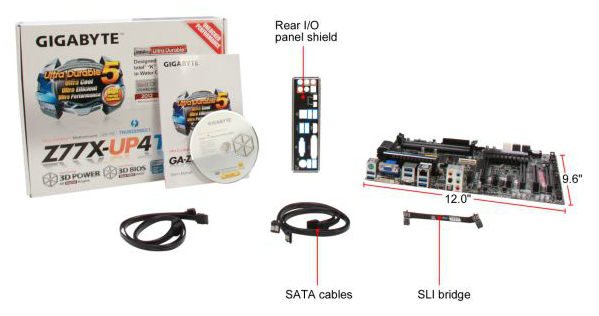
If I saw the contents of this package without the board or model in front of me, I would have paired the extras squarely inside a UD2 or UD3 package. For it to also be in the UP4 has taken me aback. No mention of a USB 3.0 panel, or an appropriate SLI bridge for 3-way. This is a Thunderbolt box – perhaps even a Thunderbolt cable or peripheral would have been some sweetening. My comments earlier regarding being built to a price ring true here as well.
Voltage Readings
After my first publication of OCCT voltage readings, a few readers responded with a more in-depth reasoning behind some of the results we were seeing. With this in mind, I would like to re-describe what we are doing with this test, and how it comes about.
Much of what an enthusiast overclocker does is monitor CPU temperature and voltage. Whatever settings a user places in the BIOS or OS is at the mercy of the motherboard - in terms of actually setting the values and reporting the values back. As an enthusiast, we have to rely on what readings we get back, and hope that motherboard manufacturers are being honest with their readings.
Take CPU voltage. What we as a user see in CPU-Z or OCCT is a time-averaged value that hides voltage ripple (if any) for power delivery. It is very easy for a motherboard manufacturer to hide this value, or to disregard slight deviations and report a constant value to the user. The CPU voltage reading can be taken at a variety of places on the power plane, which can vary between motherboards and manufacturers, meaning that each reading is essentially not comparable with the other. Nevertheless, as an enthusiast, we will constantly compare value A with value B.
Whether or not I can achieve 4.7 GHz with 1.175 volts on a particular board is inconsequential - your motherboard may perhaps produce the same result with a reading at 1.200 volts. The only way to test the actual value is with consistent methodology is via an oscilloscope connected to similar points on each board. This may sound like taking an OCCT reading is therefore redundant.
However, motherboards have settings relating to load line calibration. As load is applied to the CPU, the voltage across the processor decreases (VDroop). Load Line calibration essentially attempts to control this level of droop, by increasing voltage when voltage drops are detected away from a fixed value. Manufacturers have different ideas on how to modify LLC with respect to load, or whether the level of modification should be controlled by the user. Some manufacturers offer the option at a variety of levels, such that overclockers can be sure of the applied setting (even if it increases peak voltage, as explained by AnandTech in 2007).
By doing a full load OCCT test, we are essentially determining both how aggressive the motherboard is reporting the CPU voltage under load and how aggressive load line calibration is performing (from the point of view of the user without an oscilloscope or DVM). If someone has one of the motherboards we have tested and you have a different one, variations in load voltage should describe the offset you may require for overclock comparisons.
CPU voltage readings on Gigabyte Z77 motherboards have been odd as of late. Initially we thought that Gigabyte was manipulating the voltage readings from the board to the operating system to give a semblance of improved usage. Then on the Z77MX-D3H, even in overclocked scenarios the voltage reading was the same value as the stock reading. This made us caution a little more – what sort of games or tricks were being played? Then on the UD5H we noticed that on boards where the voltage does change under OC, while at at stock the voltage reaching can actually change, although Gigabyte has set the reading to change with a granularity of 0.01 volts. On all other motherboards we test, OCCT shows variations when the voltage fluctuates by ~0.004 volts – even though OCCT is itself a time smoothed average, we expect to see some variation. The results of this are two fold – the Gigabyte boards do vary in the voltage but they do not want the user to know about it, but if the improved power delivery of the Ultra Durable 5 system results in less ripple, why set the minimum reporting variation so high? This means that as reviewers we cannot comment on how stable the load line calibration is if no variation is seen at all. As a result, I am unwilling to add voltage values in our comparison table for boards like this, as it could hide the true representation of default LLC and load voltages. Especially as the load voltage reported under overclocking was the same as reported under stock – 1.068 volts. This means the value is being manipulated between the CPU and the OS at the BIOS level, which should never be the case.
Gigabyte Z77X-UP4 TH Overclocking
Note: Ivy Bridge does not overclock like Sandy Bridge. For a detailed report on the effect of voltage on Ivy Bridge (and thus temperatures and power draw), please read Undervolting and Overclocking on Ivy Bridge.
Experience with Gigabyte Z77X-UP4 TH
Our last overclocking experience on a Gigabyte board with Ultra Durable 5 was not a true indication of whether this enhanced power delivery affects overclocking – we were artificially limited by the weak BIOS for that review. Results for the Z77X-UP4 TH though were able to stretch our Ivy Bridge CPU more to the limit. In our manual overclocking, we even hit a magical 4.8 GHz stable, albeit nudging 100°C on our Intel AIO cooler.
The automatic overclocking using EasyTune6 was simple to handle – each overclocking ‘level’ of presets worked by default. Auto Tuning was a different matter with the system happily trying to ramp up to nearly 5 GHz before crashing spectacularly and not retaining any settings.
Overall the Ultra Durable 5 element of this board did give a sense of stability, though the lack of actual voltage reporting did not allow us to probe if Load Line Calibration was being strong and true or pushing the voltage over our settings (like on the EVGA Z77 FTW).
Methodology:
Our standard overclocking methodology is as follows. We select the automatic overclock options and test for stability with PovRay and OCCT to simulate high-end workloads. These stability tests aim to catch any immediate causes for memory or CPU errors.
For manual overclocks, based on the information gathered from previous testing, starts off at a nominal voltage and CPU multiplier, and the multiplier is increased until the stability tests are failed. The CPU voltage is increased gradually until the stability tests are passed, and the process repeated until the motherboard reduces the multiplier automatically (due to safety protocol) or the CPU temperature reaches a stupidly high level (100ºC+).
Our test bed is not in a case, which should push overclocks higher with fresher (cooler) air. We also are using Intel's All-in-one Liquid Cooler with its stock fan. This is a 120mm radiator liquid cooler, designed to mimic a medium-to-high end air cooler.
Automatic Overclock:
For our automatic overclocking, options are available through the EasyTune6 software. The initial screen presented in ET6 gives three overclock levels to choose from, or a big red ‘Auto Tuning’ button:

Here are our results:
At ET Level 1, the system applied a 41x multiplier and a 102 MHz BCLK for a total of 4.18 GHz. This was paired with a CPU voltage offset of +0.150 volts and left LLC on automatic. In this scenario, the system showed a load voltage in the OS of 1.062 volts, and peak temperatures of 81ºC during PovRay and 82ºC during OCCT.
At ET Level 2, the system applied a 43x multiplier and a 103 MHz BCLK for a total of 4.43 GHz. This was pared with a CPU voltage offset of +0.150 volts and left LLC on automatic. In this scenario, the system showed a load voltage in the OS of 1.068 volts, and peak temperatures of 82ºC during PovRay and 85ºC during OCCT.
At ET Level 3, the system applied a 45x multiplier and a 104 MHz BCLK for a total of 4.68 GHz. This was pared with a CPU voltage offset of +0.150 volts and left LLC on automatic. In this scenario, the system showed a load voltage in the OS of 1.068 volts, and peak temperatures of 93ºC during PovRay and 95ºC during OCCT.
When Auto Tuning was selected, the system rebooted under XMP settings, then performed stress tests increasing both the multiplier and the BCLK. At 48x and 103.3 MHz, the system rebooted to ET Level 2 and accepted that overclock. Sometimes Auto Tuning would fail completely, or cause the BIOS to bring up the failed boot screen.
Manual Overclock:
For a manual overclock, the user can either adjust settings in EasyTune6 or adjust the BIOS settings. The BIOS settings are a little strewn about the place, with the CPU frequencies and voltages being in separate menus, as well as LLC settings. For finer tuning of the memory, the user has to navigate back out of the CPU or voltage menus then into the memory menu.
As with our standard testing procedure, we start with 1.100 volts set in the BIOS under the top level of LLC (Extreme), and from the 44x multiplier stress test each multiplier until unstable, then up the voltage to achieve stability. Due to the BIOS voltage reporting issues mentioned previously, the load voltage reported in the BIOS at each stage was 1.068 volts, suggesting that somewhere along the line the voltage readout is being manipulated or not passed to the OS properly. Here are our results.
At the 44x multiplier with a BIOS setting of 1.100 volts, the system was stable with peak temperatures of 71ºC during PovRay and 72ºC during OCCT.
At the 45x multiplier, the system was stable at a BIOS setting of 1.100 volts. Peak temperatures reported were 70ºC for PovRay and 73ºC for OCCT.
At the 46x multiplier, the system was stable with a minimum BIOS setting of 1.150 volts. Peak temperatures reported were 77ºC for PovRay and 78ºC for OCCT.
At the 47x multiplier, the system was stable with a minimum BIOS setting of 1.200 volts. Peak temperatures reported were 84ºC for PovRay and 86ºC for OCCT.
At the 48x multiplier, the system was stable with a minimum BIOS setting of 1.300 volts. Peak temperatures reported were 100ºC for PovRay and 101ºC for OCCT.
Other multipliers were not tested due to the temperatures being reached.
Many thanks to...
We must thank the following companies for kindly donating hardware for our test bed:
OCZ for donating the Power Supply and USB testing SSD
Micron for donating our SATA testing SSD
G.Skill for donating our memory kits
ASUS for donating AMD GPUs and some IO Testing kit
ECS for donating NVIDIA GPUs
Test Setup
| Processor |
Intel Core i7-3770K ES 4 Cores, 8 Threads, 3.5 GHz (3.9 GHz Turbo) |
| Motherboards |
ASRock Z77 Extreme4 ASRock Z77 Extreme6 ASRock Z77 Extreme9 ASRock Fatal1ty Z77 Professional ASUS P8Z77-V Pro ASUS P8Z77-V Deluxe ASUS P8Z77-V Premium Biostar TZ77XE4 ECS Z77H2-AX EVGA Z77 FTW Gigabyte GA-Z77X-UD3H Gigabyte GA-Z77X-UD5H Gigabyte GA-Z77MX-D3H Gigabyte G1.Sniper 3 Gigabyte GA-Z77X-UP4 TH MSI Z77A-GD65 |
| Cooling | Intel All-in-One Liquid Cooler |
| Power Supply | OCZ 1250W Gold ZX Series |
| Memory |
GSkill RipjawsZ 4x4 GB DDR3-2400 9-11-11 Kit GSkill TridentX 2x4 GB DDR3-2666 11-13-13 Kit |
| Memory Settings | XMP (2400 9-11-11) |
| Video Cards |
ASUS HD7970 3GB ECS GTX 580 1536MB |
| Video Drivers |
Catalyst 12.3 NVIDIA Drivers 296.10 WHQL |
| Hard Drive | Micron RealSSD C300 256GB |
| Optical Drive | LG GH22NS50 |
| Case | Open Test Bed - CoolerMaster Lab V1.0 |
| Operating System | Windows 7 64-bit |
| SATA Testing | Micron RealSSD C300 256GB |
| USB 2/3 Testing | OCZ Vertex 3 240GB with SATA->USB Adaptor |
Power Consumption
Power consumption was tested on the system as a whole with a wall meter connected to the OCZ 1250W power supply, while in a dual 7970 GPU configuration. This power supply is Gold rated, and as I am in the UK on a 230-240 V supply, leads to ~75% efficiency > 50W, and 90%+ efficiency at 250W, which is suitable for both idle and multi-GPU loading. This method of power reading allows us to compare the power management of the UEFI and the board to supply components with power under load, and includes typical PSU losses due to efficiency. These are the real world values that consumers may expect from a typical system (minus the monitor) using this motherboard.
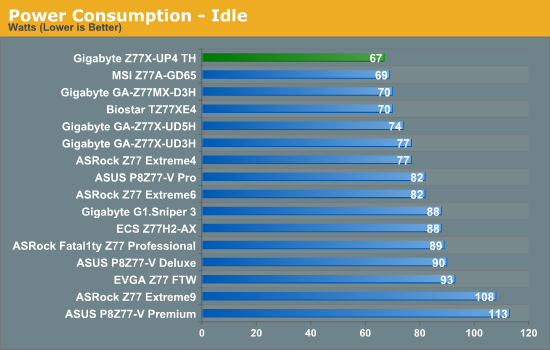
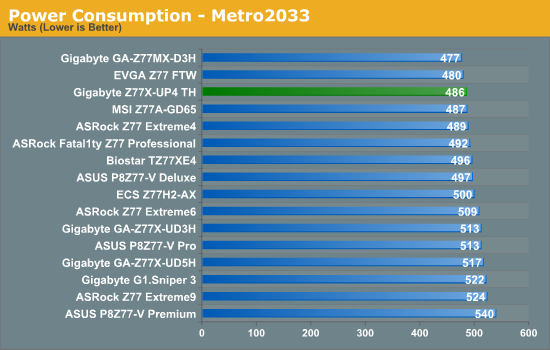
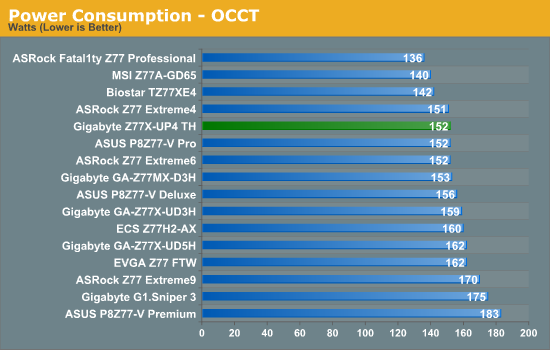
Similar to the X79S-UP5, the IR3550 ICs used in these UP boards do really well when it comes to power consumption. The Z77X-UP4 TH takes the top spot in idle power consumption on our test bed.
POST Time
Different motherboards have different POST sequences before an operating system is initialized. A lot of this is dependent on the board itself, and POST boot time is determined by the controllers on board (and the sequence of how those extras are organized). As part of our testing, we are now going to look at the POST Boot Time - this is the time from pressing the ON button on the computer to when Windows starts loading. (We discount Windows loading as it is highly variable given Windows specific features.) These results are subject to human error, so please allow +/- 1 second in these results.
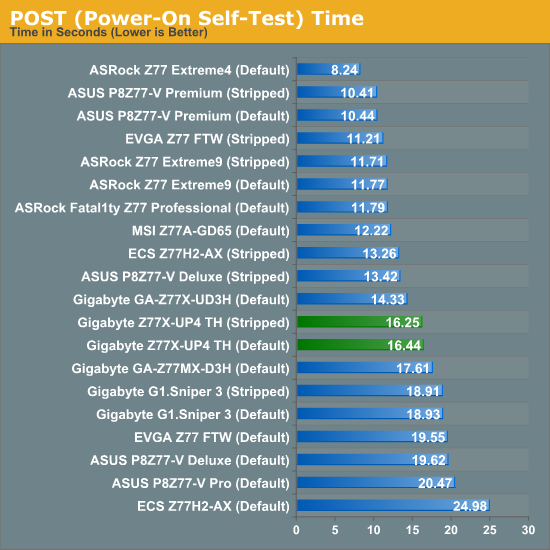
The Z77X-UP4 TH performs around the middle of the pack in the POST timing test – with ASUS running their CAP Win8 on the Premium and ASRock’s optimizations, Gigabyte are starting to get left behind a little.
Overclocks
Here at AnandTech we want to provide quick and easy ways to determine if a board is good for you (with in-depth analysis of course). So here is a quick round up of our overclocking results. Overclocks are tested for stability with PovRay and OCCT - while these may not be the most strenuous of stability tests, it does offer a quick check for memory errors under high load (and also balances testing time with getting the next board on for review!).
|
CPU Speed (MHz) |
BIOS Voltage (Volts) |
PovRay Peak Temp (ºC) |
OCCT Peak Temp (ºC) |
Notes | |
|
ASRock Fatal1ty Z77 Professional |
4700 | 1.200 | 89 | 89 | PLL Overvoltage enabled |
|
ASRock Z77 Extreme4 |
4700 | 1.175 | 86 | 86 | LLC Level 1 |
|
ASRock Z77 Extreme6 |
4700 | 1.175 | 81 | 82 | LLC Level 1 |
|
ASRock Z77 Extreme9 |
4700 | 1.200 | 92 | 94 |
*High Ambients LLC Level 1 |
|
ASUS P8Z77-V Deluxe |
4700 | 1.225 | 89 | 84 | PLL Overvoltage enabled |
|
ASUS P8Z77-V Pro |
4700 | 1.200 | 83 | 86 | PLL Overvoltage enabled |
|
ASUS P8Z77-V Premium |
4700 | 1.225 | 93 | 96 | High Ambients |
|
Biostar TZ77XE4 |
4700 | 1.180 | 84 | 85 | None |
|
ECS Z77H2-AX |
4700 | 1.125* | 87 | 90 |
*High Ambients VDroop Disabled Odd VDroop Behaviour |
|
EVGA Z77 FTW |
4700 | 1.175 | 82 | 84 |
VDroop Disabled Power Limits Raised |
|
Gigabyte Z77X-UD5H |
4700 | 1.225 | 88 | 88 | LLC Extreme |
|
Gigabyte Z77X-UD3H |
4700 | 1.200 | 82 | 86 | LLC Extreme |
|
Gigabyte Z77MX-D3H |
4700 | 1.200 | 80 | 84 | LLC Extreme |
|
Gigabyte G1.Sniper 3 |
4700 | 1.200 | 85 | 88 | LLC Extreme |
|
Gigabyte Z77X-UP4 TH |
4700 | 1.200 | 84 | 86 | LLC Extreme |
|
MSI Z77A-GD65 |
4700 | 1.250 | 90 | - | PLL Overvoltage enabled |
USB Speed
For this benchmark, we run CrystalDiskMark to determine the ideal sequential read and write speeds for the USB port using our 240 GB OCZ Vertex3 SSD with a SATA 6 Gbps to USB 3.0 converter. Then we transfer a set size of files from the SSD to the USB drive using DiskBench, which monitors the time taken to transfer. The files transferred are a 1.52 GB set of 2867 files across 320 folders – 95% of these files are small typical website files, and the rest (90% of the size) are the videos used in the Sorenson Squeeze test.
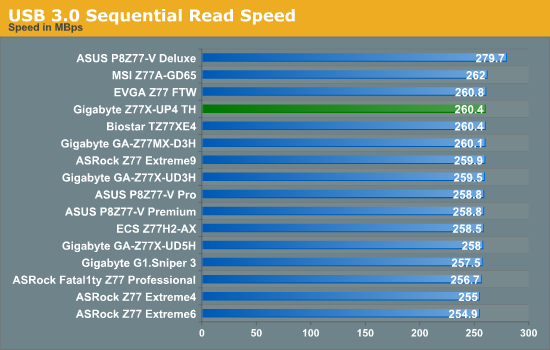
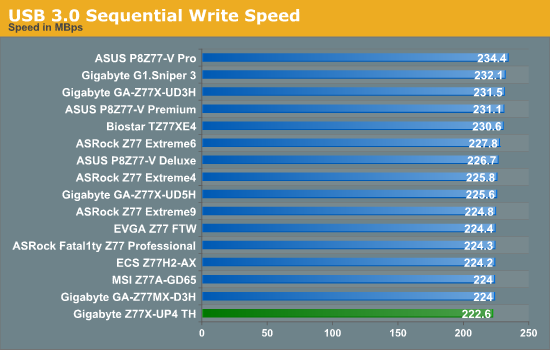
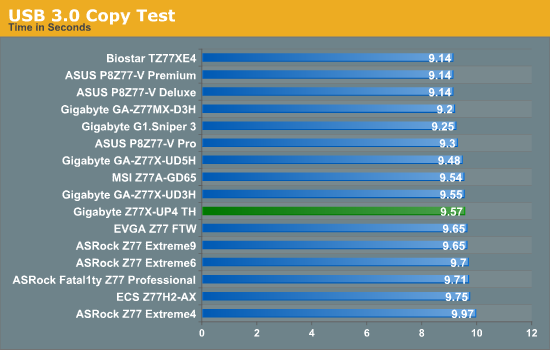
Nothing obscenely wrong comes from the Gigabyte in terms of USB 3.0 speed – even through the write speed was lower than the rest, it came mid-pack in terms of our copy test (the CPU speed may have helped here). Though out USB 3.0 copy test is starting to separate out in terms of vendor – first comes ASUS, then Gigabyte and finally ASRock.
SATA Testing
We also use CrystalDiskMark for SATA port testing on a C300 drive. The sequential test (incompressible data) is run at the 5 x 1000 MB level. This test probes the efficiency of the data delivery system between the chipset and the drive, or in the case of additional SATA ports provided by a third party controller, the efficiency between the controller, the chipset and the drive.
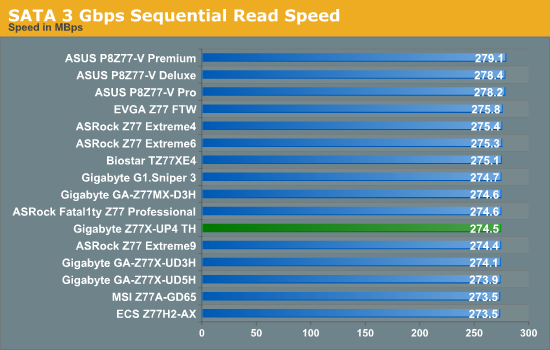
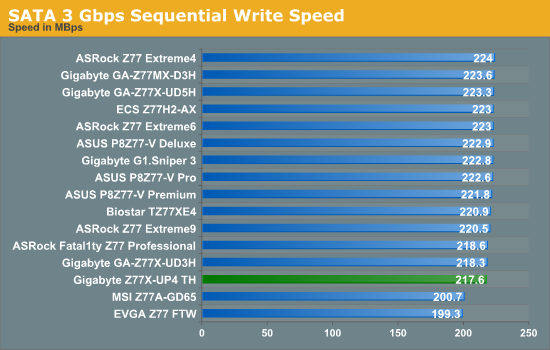
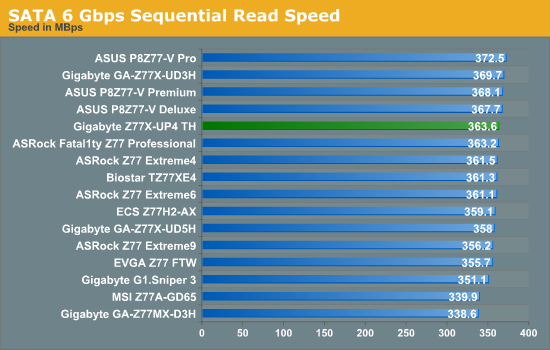

The odd blips we see from some other motherboards in terms of SATA speed are not seen here on the Z77X-UP4 TH, although the writing speed seems a little slow.
DPC Latency
Deferred Procedure Call latency is a way in which Windows handles interrupt servicing. In order to wait for a processor to acknowledge the request, the system will queue all interrupt requests by priority. Critical interrupts will be handled as soon as possible, whereas lesser priority requests, such as audio, will be further down the line. So if the audio device requires data, it will have to wait until the request is processed before the buffer is filled. If the device drivers of higher priority components in a system are poorly implemented, this can cause delays in request scheduling and process time, resulting in an empty audio buffer – this leads to characteristic audible pauses, pops and clicks. Having a bigger buffer and correctly implemented system drivers obviously helps in this regard. The DPC latency checker measures how much time is processing DPCs from driver invocation – the lower the value will result in better audio transfer at smaller buffer sizes. Results are measured in microseconds and taken as the peak latency while cycling through a series of short HD videos - under 500 microseconds usually gets the green light, but the lower the better.
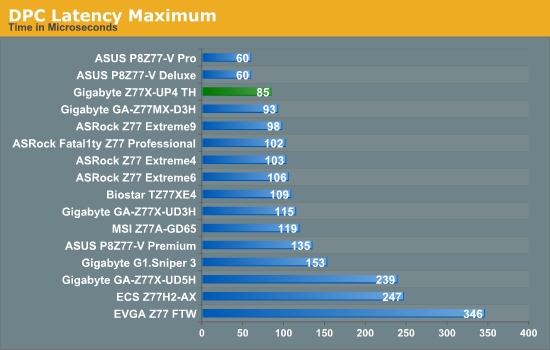
Despite the Z77X-UP4 TH falling victim to the H/W Monitor bug in terms of DPC testing (raising the value to 800+), when turned off the peak DPC Latency was 85 microseconds which is an excellent result.
3D Movement Algorithm Test
The algorithms in 3DPM employ both uniform random number generation or normal distribution random number generation, and vary in various amounts of trigonometric operations, conditional statements, generation and rejection, fused operations, etc. The benchmark runs through six algorithms for a specified number of particles and steps, and calculates the speed of each algorithm, then sums them all for a final score. This is an example of a real world situation that a computational scientist may find themselves in, rather than a pure synthetic benchmark. The benchmark is also parallel between particles simulated, and we test the single thread performance as well as the multi-threaded performance.
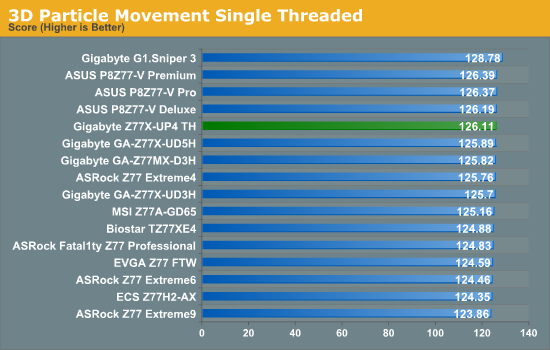
Despite the fact that single threaded performance should not be affected by Multicore Enhancement, the Gigabyte and ASUS boards do seem to have a small advantage here by less than 1%. As the G1.Sniper 3 has MCE-Plus, it still comes top.
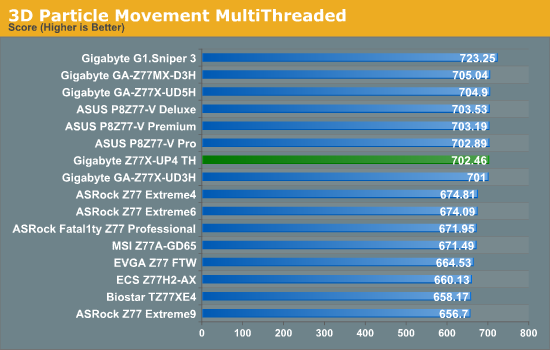
For our 3DPM-MT test, cores and MHz rain supreme and it is the boards with MCE or MCE-Plus that gets top marks. As such, the UP4 TH falls in the MCE range on 702.46 million movements per second.
WinRAR x64 3.93 - link
With 64-bit WinRAR, we compress the set of files used in the USB speed tests. WinRAR x64 3.93 attempts to use multithreading when possible, and provides as a good test for when a system has variable threaded load. If a system has multiple speeds to invoke at different loading, the switching between those speeds will determine how well the system will do.
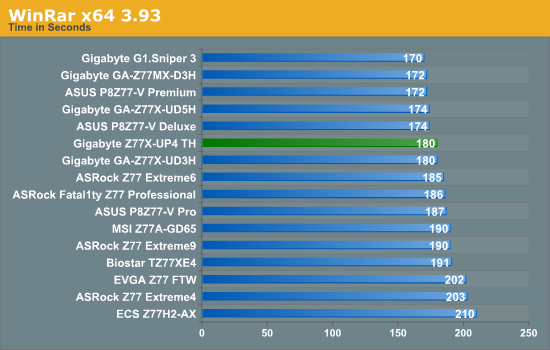
Similar to 3DPM-MT, cores and MHz rain supreme in our WinRAR testing, although the ability for motherboards to implement the fast speed is also a factor. The Z77X-UP4 TH falls short of the fastest Z77 board by 10 seconds, but still ends up better than the average time.
FastStone Image Viewer 4.2 - link
FastStone Image Viewer is a free piece of software I have been using for quite a few years now. It allows quick viewing of flat images, as well as resizing, changing color depth, adding simple text or simple filters. It also has a bulk image conversion tool, which we use here. The software currently operates only in single-thread mode, which should change in later versions of the software. For this test, we convert a series of 170 files, of various resolutions, dimensions and types (of a total size of 163MB), all to the .gif format of 640x480 dimensions.
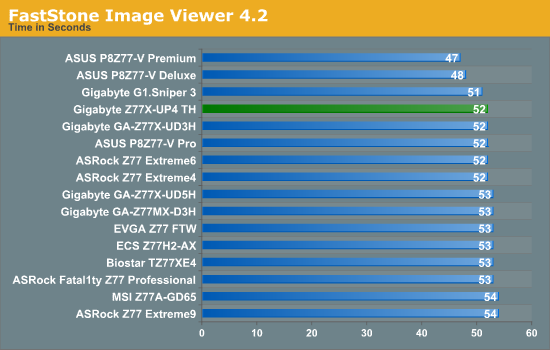
At a time of 52 seconds, the Z77X-UP4 TH comes near the middle of the pack. Nothing seems to be able to catch the ASUS Deluxe and Premium in this test.
Xilisoft Video Converter
With XVC, users can convert any type of normal video to any compatible format for smartphones, tablets and other devices. By default, it uses all available threads on the system, and in the presence of appropriate graphics cards, can utilize CUDA for NVIDIA GPUs as well as AMD APP for AMD GPUs. For this test, we use a set of 32 HD videos, each lasting 30 seconds, and convert them from 1080p to an iPod H.264 video format using just the CPU. The time taken to convert these videos gives us our result.
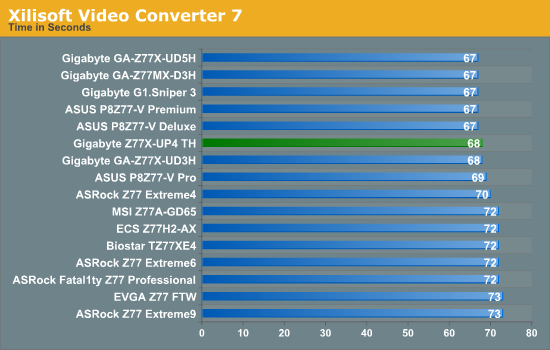
Video conversion is a classic test of cores and MHz, so as a result the UP4 TH performs well with 68 seconds, one second off our top spot held by five boards.
x264 HD Benchmark
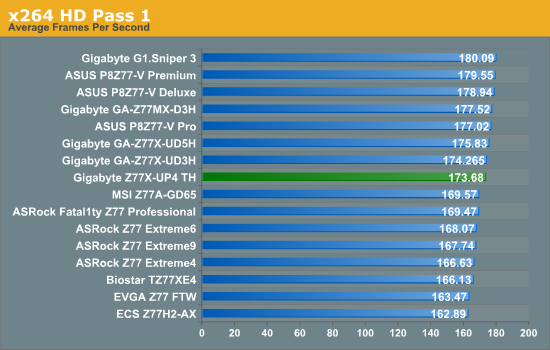
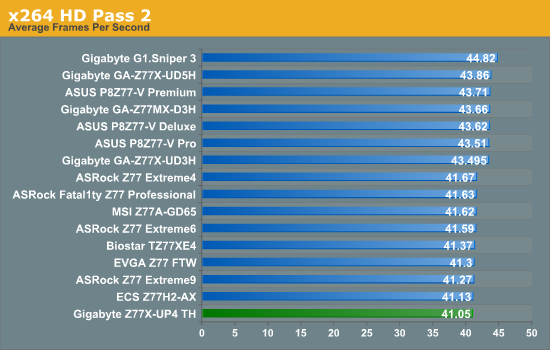
The x264 HD Benchmark uses a common HD encoding tool to process an HD MPEG2 source at 1280x720 at 3963 Kbps. This test represents a standardized result which can be compared across other reviews, and is dependant on both CPU power and memory speed. The benchmark performs a 2-pass encode, and the results shown are the average of each pass performed four times.
Dirt 3
Dirt 3 is a rallying video game and the third in the Dirt series of the Colin McRae Rally series, developed and published by Codemasters. Using the in game benchmark, Dirt 3 is run at 2560x1440 with full graphical settings. Results are reported as the average frame rate across four runs.
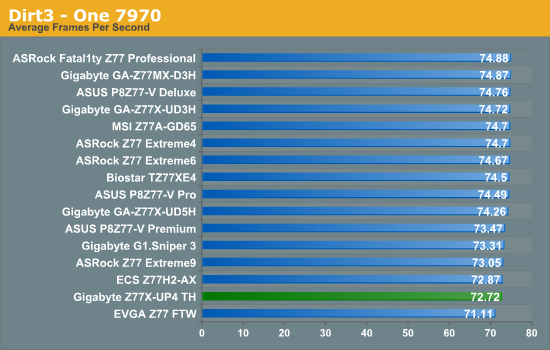
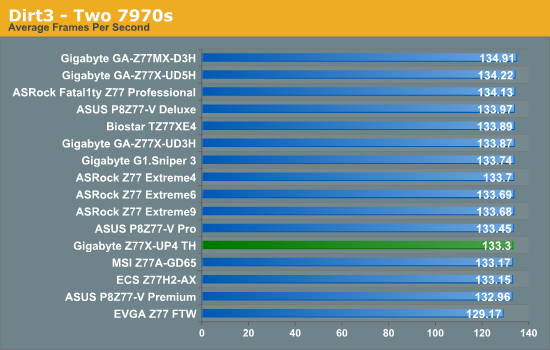
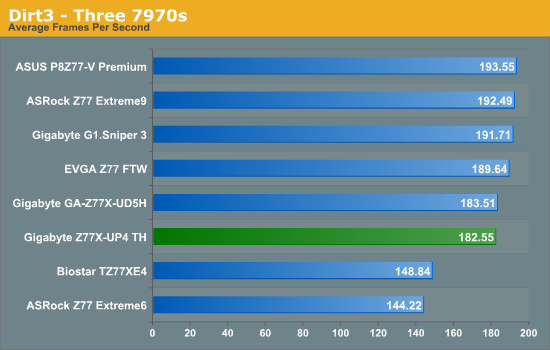
The Z77X-UP4 TH has a lane allocation of x16 in single GPU, x8/x8 in dual GPU and x8/x4/x4 in tri-GPU. As a result, it should perform as normal with the other boards in our Dirt3 testing, however it often seems to fall near the bottom. In the tri-GPU test, the boards are split clearly between those with PLX 8747 chips, those on PCIe 3.0 x8/x4/x4, and the final two that have x8/x8/x4 (PCIe 3.0/PCIe 3.0/PCIe 2.0). Having all the lanes go through the CPU rather than via the chipset makes a difference on that third card.
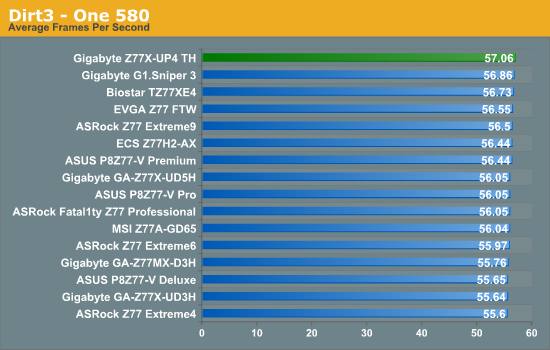
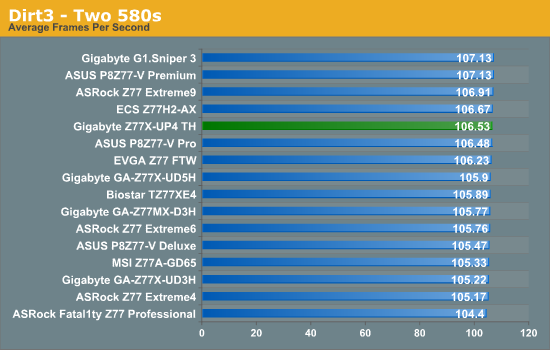
As seen regularly, NVIDIA testing fails to show much difference between the boards – even between MCE and non-MCE boards.
Metro2033
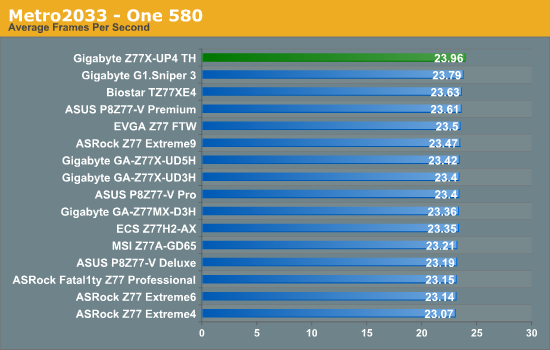
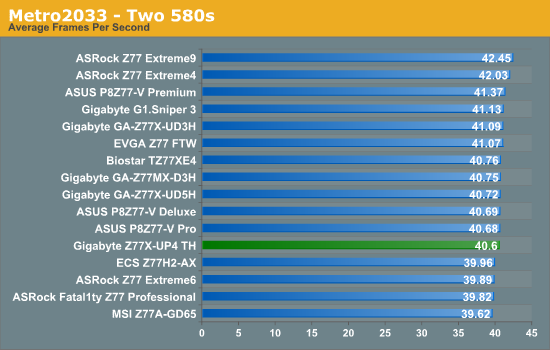
Metro2033 is a DX11 benchmark that challenges every system that tries to run it at any high-end settings. Developed by 4A Games and released in March 2010, we use the inbuilt DirectX 11 Frontline benchmark to test the hardware at 2560x1440 with full graphical settings. Results are given as the average frame rate from 4 runs.
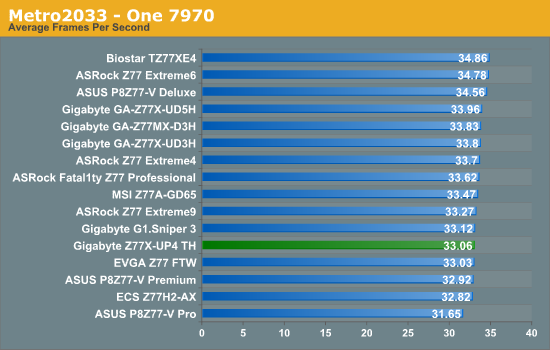
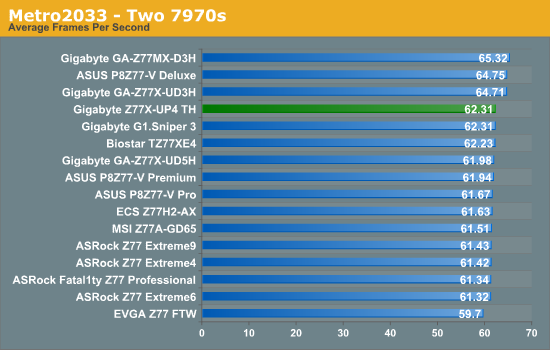
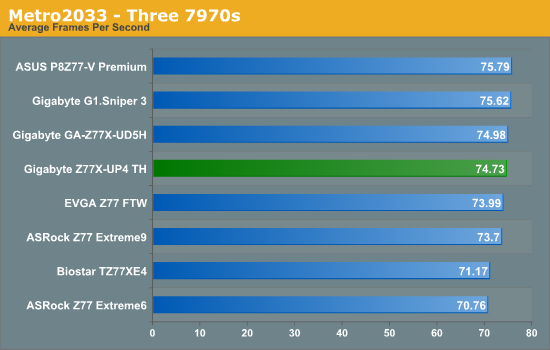
Similar to Dirt3, the Z77X-UP4 TH does not seem to perform at the top end in our AMD testing.
The Gigabyte Z77X-UP4 TH sits between a rock and a hard place. At the lowest level, this motherboard is very basic – we get an extra USB 3.0 controller, but Realtek ALC892 audio codec, Realtek internet, no extra SATA ports. On top of this though, the board has a Thunderbolt controller with two ports and support for up to 12 Thunderbolt devices, as well as Gigabyte’s Ultra Durable 5 meaning IR3550 PowIRstage power delivery for cooler operation and reduced power consumption.
At this price bracket, the main competition comes from Gigabyte’s own Z77X-UD5H. In comparison, the UD5H gets dual NIC (one Intel), extra SATA 6 Gbps ports, up to 10 USB 3.0 ports, power switches and debug LED, all four video outputs from the integrated graphics and a bit more in the box in the form of a USB 3.0 panel with the same PCIe 3.0 GPU lane allocation. So it would come down to what you would want in your product – power consumption and Thunderbolt on the UP4 TH, or SATA ports, NICs and more USB on the UD5H. It all depends on the uptake of Thunderbolt in your personal life.
Performance wise at stock shows that Gigabyte has enabled Multicore Enhancement on this board, meaning that when XMP is applied the system will cause the CPU to run at the top turbo bin multiplier, giving 200 MHz more at full load than some other boards. This makes the UP4 TH come up in the top echelons of our more CPU oriented multithreaded tests. Nothing too special from our IO testing comes out, though the use of the four port USB 3.0 VIA chip is always a little limiting compared to two port ASMedia USB 3.0 chips. GPU testing shows that a three-GPU scenario (x8/x4/x4 at PCIe 3.0) is not affected by the lane count. Our AMD GPU testing shows results that seem to be a little lower in comparison to other Z77 boards.
Software, as we have said for a few Gigabyte motherboards now, needs a push into this decade as it feels old, still affects DPC latency, and we are getting multiple programs to install rather than have them all under one heading. The BIOS is getting better in terms of Gigabyte’s earlier implementations of a graphical interface on X79, but it still lacks a little organizational quality for power users.
Do not get me wrong – PowIRstage and Thunderbolt are great things to have on a motherboard but at the minute their implementation is an added luxury and pushes boards out of their price bracket. As a non-TB user, PowIRstages make more sense in a mini-ITX system or when I am pushing for an overclock. The UP4 TH did overclock better than most of the boards it must be said, but individually I would prefer the extra SATA, extra USB 3.0 and extra NICs that the UD5H provides.

